
Go to Settings>Customization>Solutions
1. First create the Solution and go to Components, click Add Existing and than select Site map.

2. Export the solution and save it. The solution will save as a zip file.
3. Extract the zip file. You should now see 3 files in the folder. We need to edit customizations.xml file

4. Search for the Area you wish to rename and add the following.
<Titles>
<Title ="Projects" LCID="1033"/>
</Titles>
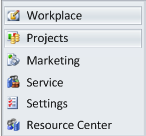
I am going to rename Sales to Projects. My code is going to look like this when i add the above:<Area Id="SFA" ResourceId="Area_Sales" Icon="/_imgs/sales_24x24.gif" DescriptionResourceId="Sales_Description" >
<Titles>
<Title ="Projects" LCID="1033"/>
</Titles>
<Group Id="SFA">
<SubArea Id="nav_leads" Entity="lead" DescriptionResourceId="Lead_SubArea_Description" GetStartedPanePath="Leads_Web_User_Visor.html" GetStartedPanePathAdmin="Leads_Web_Admin_Visor.html" GetStartedPanePathOutlook="Leads_Outlook_User_Visor.html" GetStartedPanePathAdminOutlook="Leads_Outlook_Admin_Visor.html" />
</Group>
</Area>
5. Save the changes, zip up the files and import it back into the CRM. Once imported and published. Refresh the browser to see your changes.
Thank You, for providing the valuable information.
ReplyDeletetop crm companies